Introduction:
In today’s fast-paced DevOps world, securely managing secrets is no longer optional — it’s necessary. If you’re working with AWS, Jenkins, and Terraform, you’ve probably faced the challenge of securely handling sensitive credentials like access and secret keys. That’s where HashiCorp Vault comes in!
This guide walks you through a practical, step-by-step approach to securely storing and retrieving AWS credentials using Vault and seamlessly integrating them into your Jenkins CI/CD pipeline. By the end, you’ll know how to create infrastructure in AWS with Terraform while keeping your secrets safe and out of harm’s way. Let’s dive into building a secure and efficient workflow!
What is a HashiCorp Vault?
HashiCorp Vault is a secret management tool that offers secure and dynamic access to credentials, API keys, certificates, and other sensitive information.
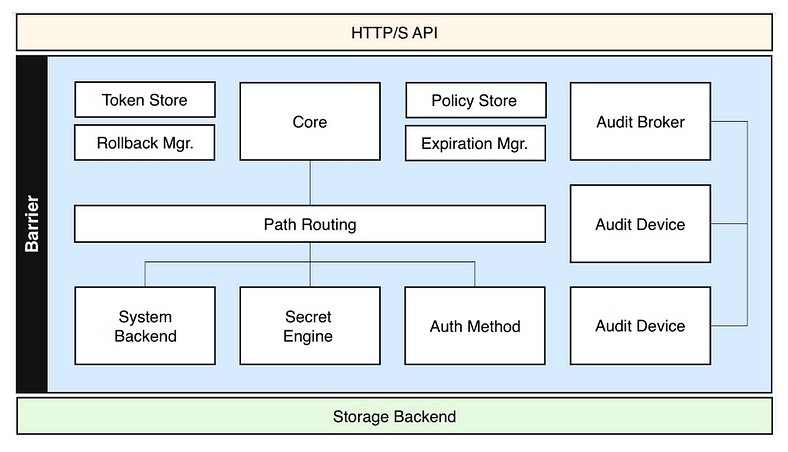
HashiCorp Vault Architecture:
Vault internal architecture can be summarised using the following diagram:

🔑 Key Components of Vault Architecture
2.1 Vault Core
- Vault Server: Central service managing requests, secrets, and interactions.
- Modes: Dev (local testing) and Cluster (high availability).
- API: RESTful endpoints for client integrations.
- Vault Agent: Lightweight process to authenticate and fetch secrets for applications.
2.2 Vault Storage Backend
- Purpose: Store encrypted data and metadata.
- Design: Backends never see plaintext data.
- Supported Backends: Consul (ideal for production), AWS S3, Google Cloud Storage, etcd, File system.
2.3 Authentication Methods
- Clients authenticate via methods like:
- Token: Simplest form.
- AppRole: Role-based for CI/CD tools.
- Kubernetes: Pod-level authentication.
- AWS IAM, Azure AD: Native cloud identity integration.
2.4 Secrets Engines
- Static Secrets: Predefined API keys (e.g., Key-Value engine).
- Dynamic Secrets: Generate secrets on demand (e.g., AWS credentials).
- Popular Engines: KV, AWS, Database, PKI (X.509 certificates).
2.5 Policies
- Define access using HashiCorp Configuration Language (HCL).
- Enforce granular access control (e.g., read, write, list operations).
2.6 High Availability
- HA Mode: Active/Standby architecture with backends like Consul.
- Failover: Standby nodes take over if the active node fails.
2.7 Encryption and Security
- AES-256-GCM for encryption.
- Master Key: Managed using Shamir’s Secret Sharing for unsealing.
- Data encrypted at rest and in transit (TLS).
2.8 Audit Logs
- Logs every interaction for traceability.
- Integrations: Splunk, Elasticsearch, or file sinks.
2.9 Lease Management
- Secrets have a time-to-live (TTL), ensuring auto-expiry and revocation.
🛠️ Vault Operational Flow
(Applications, CI/CD Tools)
Authentication (AppRole, Token, etc.)
|
– REST API
– Core Logic
– Policy Engine
– Lease Manager
Policy Enforcement
|
(e.g., AWS, KV, Database, PKI)
Encrypt Data & Metadata (AES-256-GCM)
|
(Consul, AWS S3, etcd, File System)
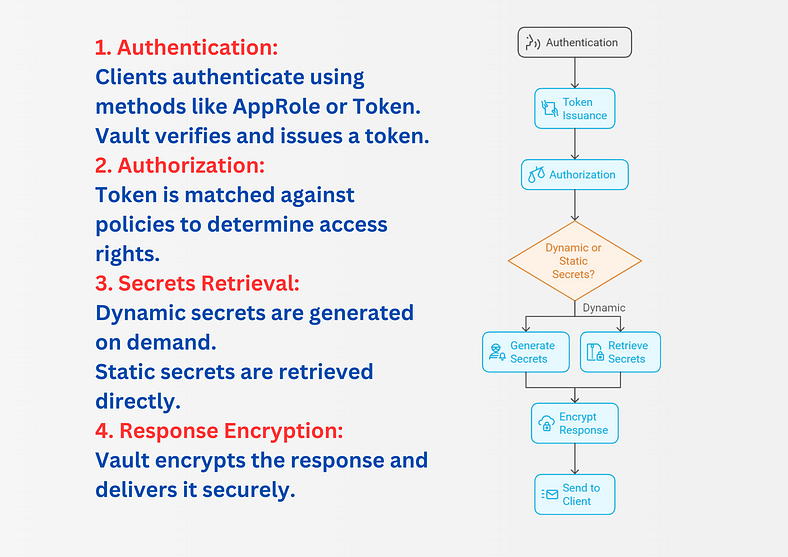
Vault’s operational flow can be summarized in four key steps:

🌟 Real-World Example: Jenkins Pipeline with Vault
Scenario:
A Jenkins CI/CD pipeline requires AWS credentials for Terraform. To maintain security, these credentials are securely stored in Vault and retrieved dynamically during the pipeline execution.
Flow Overview
- Store AWS Credentials in Vault:
- Vault admin stores AWS Access Key and Secret Key in a KV Secrets Engine.
- Policies are defined to control access.
2. Configure Vault and Jenkins:
- Vault authentication is set up for Jenkins (using AppRole).
- Jenkins pipeline fetches AWS credentials dynamically during runtime.
3. Run Jenkins Pipeline:
- Jenkins pulls Terraform code from the GitHub repository.
- Jenkins fetches AWS credentials from Vault and passes them to Terraform as environment variables.
- Terraform uses the credentials to create AWS resources.
Flow Diagram

Logical Flow
Step 1: Install HashiCorp Vault
Prerequisites:
- A server with at least 2GB RAM and 2 CPUs.
- OS: Ubuntu, CentOS, or another Linux distribution.
- Open ports: 8200 (Vault HTTP API) and 8201 (Cluster communication).

Steps to Install:
- Download Vault binary:
CentOS/RHEL:
Install yum-config-manager to manage your repositories:
sudo yum install -y yum-utils
Use yum-config-manager to add the official HashiCorp Linux repository:
sudo yum-config-manager --add-repo https://rpm.releases.hashicorp.com/RHEL/hashicorp.repo
Install Vault:
sudo yum -y install vault


Step 2: Verifying the Installation:
vault --version

After installing Vault, verify the installation worked by opening a new terminal session and checking that the vault binary is available. By executing vault, you should see help output similar to the following:
Common commands:
    read        Read data and retrieves secrets
    write       Write data, configuration, and secrets
    delete      Delete secrets and configuration
    list        List data or secrets
    login       Authenticate locally
    agent       Start a Vault agent
    server      Start a Vault server
    status      Print seal and HA status
    unwrap      Unwrap a wrapped secret

Other commands:
    audit                Interact with audit devices
    auth                 Interact with auth methods
    debug                Runs the debug command
    events
    hcp
    kv                   Interact with Vault's Key-Value storage
    lease                Interact with leases
    monitor              Stream log messages from a Vault server
    namespace            Interact with namespaces
    operator             Perform operator-specific tasks
    patch                Patch data, configuration, and secrets
    path-help            Retrieve API help for paths
    pki                  Interact with Vault's PKI Secrets Engine
    plugin               Interact with Vault plugins and catalog
    policy               Interact with policies
    print                Prints runtime configurations
    proxy                Start a Vault Proxy
    secrets              Interact with secrets engines
    ssh                  Initiate an SSH session
    token                Interact with tokens
    transform            Interact with Vault's Transform Secrets Engine
    transit              Interact with Vault's Transit Secrets Engine
    version-history      Prints the version history of the target Vault server
Step 3: Start the Vault Server Manually
Test Vault Without TLS (Optional for Debugging):
- Temporarily disable TLS to check if Vault starts correctly. Modify the listener in vault.hcl:
sudo vi /etc/vault.d/vault.hcl
listener "tcp" {
  address     = "0.0.0.0:8200"
  tls_disable = 1
}
sudo systemctl enable vault
sudo systemctl start vault
sudo systemctl status vault

Check if Port 8200 is Open:
sudo ss -tuln | grep 8200
Test External Connection:
export VAULT_ADDR="http://:8200"
vault status
Example:
export VAULT_ADDR="http://3.94.115.151:8200"
vault status

To configure HashiCorp Vault as a default service that starts automatically when the server boots, you must set up a systemd service unit on Linux.
Follow the steps below to achieve this:
Step 1: Create a Systemd Service File for Vault
1. Open a terminal and create the Vault service file using a text editor like vi or nano:
sudo vi /etc/systemd/system/vault.service
2. Paste the following content into the file:
[Unit]
Description=HashiCorp Vault - A tool for managing secrets
Documentation=https://developer.hashicorp.com/vault/docs
Requires=network-online.target
After=network-online.target

[Service]
User=root
Group=root
ExecStart=/usr/bin/vault server -config=/etc/vault.d/vault.hcl
ExecReload=/bin/kill --signal HUP $MAINPID
Restart=on-failure
LimitNOFILE=65536

[Install]
WantedBy=multi-user.target
Step 2: Reload Systemd Configuration
After creating the vault.service file, reload the systemd configuration to recognize the new service:
sudo systemctl daemon-reload
Step 3: Enable Vault Service to Start on Boot:
sudo systemctl enable vault
sudo systemctl start vault
sudo systemctl status vault

Step 4: Test Automatic Startup on Reboot
Please restart the server to ensure that the Vault service starts automatically.
sudo reboot
After the server restarts, check the status of the Vault service again:
sudo systemctl status vault
Persistent Configuration
To avoid needing to set VAULT_ADDR every time, add it to your shell’s configuration file. (~/.bashrc or ~/.bash_profile):
echo 'export VAULT_ADDR="http://:8200"' >> ~/.bashrc
source ~/.bashrc

Next Steps:
1. Initialize Vault:
To start using Vault, you need to initialize it:
vault operator init
This will output:
- 5 unseal keys (used to unseal Vault).
- Root token (used to log in and manage Vault)

Important:
- Save these keys securely (e.g., password manager, encrypted storage). Losing them can lock you out of Vault.
- You’ll need at least 3 unseal keys to unseal Vault.
2. Unseal Vault:
- To make Vault operational, you must provide a quorum of unseal keys (e.g., 3 out of 5) to decrypt the master key.
- This ensures that no single individual has complete control over the Vault, making it more secure.
Use the vault operator unseal command with three of the unseal keys generated during initialization:
vault operator unseal
vault operator unseal
vault operator unseal

The vault operator unseal command was successful, and the Vault server is now unsealed and operational.
3. Log in to Vault:
Defines the Vault Server Address:
- The
VAULT_ADDRenvironment variable specifies the protocol (http:// or https://), the IP address (3.94.115.151), and the port (8200) where the Vault server is running. - This ensures that any
vaultCLI commands know where to send API requests.
Enables Seamless CLI Operations:
- With VAULT_ADDR set, you don’t need to specify the server address with every vault CLI command.
- For example, instead of running:
vault login -address=http://3.94.115.151:8200
You can run:
vault login

Store AWS Credentials in Vault
1. Enable the KV Secrets Engine in Vault:
vault secrets enable -path=aws kv
2. Verify that the secrets engine is enabled:
vault secrets list

3. Add your AWS credentials (Access Key ID and Secret Access Key) to Vault:
vault kv put aws/terraform-project aws_access_key_id=your-access-key-id aws_secret_access_key=your-secret-access-key
- aws: Represents a namespace or folder for AWS-related secrets in Vault.
- terraform-project: Represents a specific Terraform project using AWS credentials.
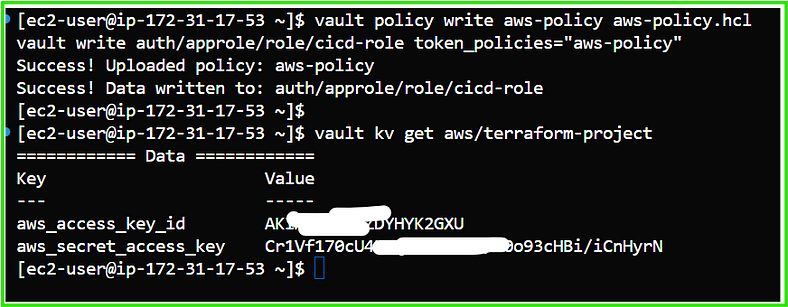
4. Verify that the secret is stored:
vault kv get aws/terraform-project

5. Configure Vault Authentication:
5.1. Enable AppRole Authentication:
vault auth enable approle
5.2. Create a Policy for Access: Create a policy file, e.g., aws-policy.hcl:
path "aws/terraform-project" {
    capabilities = ["read"]
}
Apply the policy:
vault policy write aws-policy aws-policy.hcl
vault write auth/approle/role/cicd-role token_policies="aws-policy"
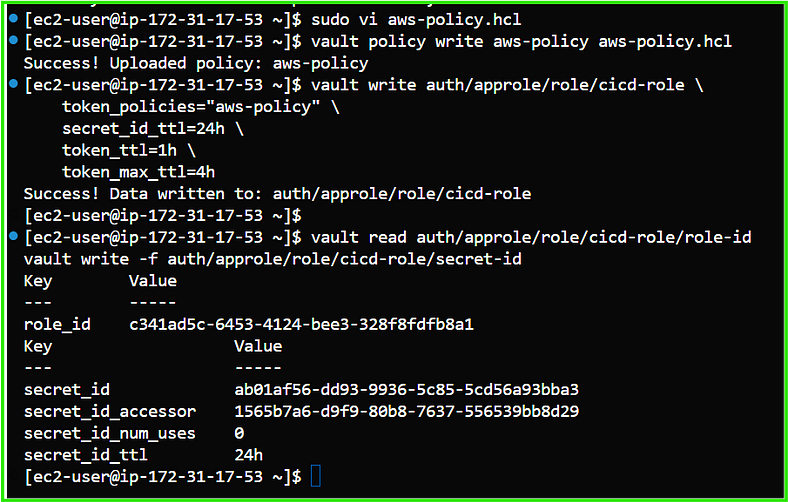
5.3. Create an AppRole:
vault write auth/approle/role/cicd-role
I am running a few minutes late; my previous meeting is running over.
    token_policies="aws-policy" Thank you for reaching out.
    secret_id_ttl=24h \
    token_ttl=1h \
    token_max_ttl=4h
5.4. Retrieve Role ID and Secret ID:
vault read auth/approle/role/cicd-role/role-id
vault write -f auth/approle/role/cicd-role/secret-id


Configure Jenkins to Use Vault
Install Jenkins:
#!/bin/bash

################################################################################
# Script Name: install_jenkins.sh
# Author: S. Subba Reddy
# Created On: December 15, 2024
# Purpose: Automate the installation of Java 17 and Jenkins on a Linux server.
# Description: This script installs Java 17 (if not already installed),
#              Jenkins, and configures Jenkins to run as a service with proper
#              permissions and optional Docker integration.
################################################################################

# Exit on any error
set -e

# Run the script as a root user
sudo bash << 'EOF'

################################################################################
# Step 1: Check and Install Java 17
################################################################################
# Jenkins requires Java 17. This step ensures Java 17 is installed on the server.
echo "Checking Java version..."
if ! javac --version 2>/dev/null | grep -q "javac 17"; then
    echo "Java 17 not found. Installing Java 17..."
    sudo apt update                           # Update package lists
    sudo apt install openjdk-17-jdk -y       # Install OpenJDK 17
else
    echo "Java 17 is already installed."      # Skip installation if found
fi
javac --version                              # Verify Java version installed

################################################################################
# Step 2: Jenkins Installation
################################################################################
# Install Jenkins from the official Jenkins repository.

echo "Starting Jenkins installation..."

# Install necessary tools (wget and curl)
sudo apt install wget curl -y

# Add Jenkins repository key
curl -fsSL https://pkg.jenkins.io/debian-stable/jenkins.io-2023.key | sudo tee /usr/share/keyrings/jenkins-keyring.asc > /dev/null

# Add Jenkins repository to the system package sources
echo deb [signed-by=/usr/share/keyrings/jenkins-keyring.asc] https://pkg.jenkins.io/debian-stable binary/ | sudo tee /etc/apt/sources.list.d/jenkins.list > /dev/null

# Update package list to include Jenkins repository
sudo apt update

# Install Jenkins
sudo apt install jenkins -y

# Enable Jenkins to start at boot
sudo systemctl enable jenkins

# Start Jenkins service
sudo systemctl start jenkins

# Verify Jenkins service status (non-interactive check)
echo "Checking Jenkins service status..."
sudo systemctl is-active jenkins

################################################################################
# Step 3: Configure Jenkins User Permissions
################################################################################
# Ensure the Jenkins user has correct permissions to its home directory.

echo "Ensuring Jenkins user has correct permissions on its directory..."
sudo chown -R jenkins:jenkins /var/lib/jenkins

################################################################################
# Step 4: Add Jenkins User to Sudo Group (Optional)
################################################################################
# If Jenkins needs to perform privileged tasks, add the Jenkins user to the sudo group.

echo "Adding Jenkins user to the sudo group (optional)..."
sudo usermod -aG sudo jenkins

################################################################################
# Step 5: Add Jenkins User to Docker Group (Optional)
################################################################################
# If Docker is part of the CI/CD pipeline, add Jenkins user to Docker group.

echo "Adding Jenkins user to the docker group..."
sudo usermod -aG docker jenkins

################################################################################
# Step 6: Fetch Initial Admin Password
################################################################################
# The initial admin password is required for Jenkins' first-time setup.

echo "Fetching Jenkins initial admin password..."
sudo cat /var/lib/jenkins/secrets/initialAdminPassword

################################################################################
# Script Complete
################################################################################
echo "Jenkins installation and configuration complete."
echo "You can now access Jenkins at: http://:8080"

EOF
Install Plugins in Jenkins:
1. Go to Manage Jenkins → Plugin Manager → Install the HashiCorp Vault Plugin.

2. AWS Plugins:


3. Terraform Plugin:

4. GitHub Integration Plugin:

Integrate Vault with CI/CD Pipeline
1. Add Role ID and Secret ID to Jenkins Credentials:
- Go to Jenkins > Manage Jenkins > Manage Credentials.
- Add the following credentials:
- Role ID: As Secret Text. Save it with a meaningful name, e.g., vault-role-id.
- Secret ID: As Secret Text. Save it with a name, e.g., vault-secret-id.
- Vault URL: As Secret Text. Save it with a name, e.g., VAULT_URL.


Test Your Configuration
Run a simple Jenkins pipeline to verify integration:
pipeline {
    agent any

    environment {
        VAULT_URL = '' // Declare the variable to store the Vault URL from credentials
    }

    stages {

        stage("Debug Vault Credentials") {
            steps {
                script {
                    echo "Verifying Vault Credentials Configuration..."
                    withCredentials([
                        string(credentialsId: 'VAULT_URL', variable: 'VAULT_URL'),
                        string(credentialsId: 'vault-role-id', variable: 'VAULT_ROLE_ID'),
                        string(credentialsId: 'vault-secret-id', variable: 'VAULT_SECRET_ID')
                    ]) {
                        echo "Vault Role ID is available"
                        echo "Vault Secret ID is available"
                    }
                }
            }
        }

        stage("Test Vault Connectivity and Login") {
            steps {
                script {
                    withCredentials([
                        string(credentialsId: 'VAULT_URL', variable: 'VAULT_URL'),
                        string(credentialsId: 'vault-role-id', variable: 'VAULT_ROLE_ID'),
                        string(credentialsId: 'vault-secret-id', variable: 'VAULT_SECRET_ID')
                    ]) {
                        echo "Testing Vault Connectivity..."
                        sh '''
                        # Set Vault address
                        export VAULT_ADDR="${VAULT_URL}"

                        # Log into Vault using AppRole
                        echo "Logging into Vault using AppRole..."
                        VAULT_TOKEN=$(vault write -field=token auth/approle/login role_id=${VAULT_ROLE_ID} secret_id=${VAULT_SECRET_ID})
                        echo "Vault Login Successful"

                        # Verify connectivity
                        vault status
                        '''
                    }
                }
            }
        }

        stage("Get AWS Creds from Vault") {
            steps {
                script {
                    echo "Fetching AWS Credentials from Vault..."
                    withCredentials([
                        string(credentialsId: 'VAULT_URL', variable: 'VAULT_URL'),
                        string(credentialsId: 'vault-role-id', variable: 'VAULT_ROLE_ID'),
                        string(credentialsId: 'vault-secret-id', variable: 'VAULT_SECRET_ID')
                    ]) {
                        sh '''
                        # Set Vault address
                        export VAULT_ADDR="${VAULT_URL}"

                        echo "Logging into Vault..."
                        VAULT_TOKEN=$(vault write -field=token auth/approle/login role_id=${VAULT_ROLE_ID} secret_id=${VAULT_SECRET_ID})
                        export VAULT_TOKEN=$VAULT_TOKEN

                        # Fetch AWS Secrets
                        echo "Retrieving AWS Secrets from Vault..."
                        AWS_ACCESS_KEY_ID=$(vault kv get -field=aws_access_key_id aws/terraform-project)
                        AWS_SECRET_ACCESS_KEY=$(vault kv get -field=aws_secret_access_key aws/terraform-project)

                        echo "AWS Credentials retrieved successfully"
                        export AWS_ACCESS_KEY_ID
                        export AWS_SECRET_ACCESS_KEY
                        '''
                    }
                }
            }
        }

        stage("Install Terraform") {
            steps {
                script {
                    echo "Installing Terraform..."
                    sh '''
                    wget -q -O terraform.zip https://releases.hashicorp.com/terraform/1.3.4/terraform_1.3.4_linux_amd64.zip
                    unzip -o terraform.zip
                    rm -f terraform.zip
                    chmod +x terraform
                    ./terraform --version
                    '''
                }
            }
        }

        stage("Terraform Init") {
            steps {
                script {
                    echo "Initializing Terraform..."
                    sh '''
                    export AWS_ACCESS_KEY_ID=$AWS_ACCESS_KEY_ID
                    export AWS_SECRET_ACCESS_KEY=$AWS_SECRET_ACCESS_KEY
                    ./terraform init
                    '''
                }
            }
        }

    }

    post {
        success {
            echo "Pipeline executed successfully."
        }
        failure {
            echo "Pipeline failed. Please check the logs for errors."
        }
        always {
            echo "Cleaning up..."
            sh 'rm -rf ./terraform'
        }
    }
}
Output:


We have successfully retrieved AWS credentials from Vault and integrated them into our CI/CD pipeline script.
Note:
- The ‘Debug Vault Credentials,’ ‘Test Vault Connectivity,’ and ‘Login’ stages are intended solely for debugging and verifying connectivity.
- I did not check out any Terraform source code into the Jenkins workspace from the GitHub repository. This demo is solely to demonstrate retrieving AWS credentials from Vault and using them in a CI/CD pipeline with Terraform.
Conclusion
This guide demonstrated how to securely integrate HashiCorp Vault into a Jenkins CI/CD pipeline to dynamically retrieve AWS credentials for running Terraform. Here’s what we achieved:
1. Secure Credential Management: AWS credentials are stored in Vault and accessed securely during pipeline execution using AppRole, eliminating hardcoding of sensitive data.
2. Dynamic Retrieval: The pipeline dynamically fetches credentials when needed, ensuring secure and controlled access with minimal risk of exposure.
3. Automated Pipeline Workflow:
- Validates Vault connectivity and authentication.
- Fetches AWS credentials securely.
- Installs and runs Terraform for infrastructure provisioning.
- Cleans up temporary files after execution to maintain workspace hygiene.
4. Enhanced Security Practices:
- Secrets are masked in pipeline logs.
- Credentials are used only during runtime, adhering to best practices for DevOps security.
This approach simplifies credential management while enhancing the security and efficiency of your CI/CD pipeline. It’s a reliable way to ensure your infrastructure deployments remain both automated and secure.
What are your thoughts on this article? Feel free to share your opinions in the comments below — or above, depending on your device! If you enjoyed the story, please consider supporting me by clapping, leaving a comment, and highlighting your favorite parts.
Visit subbutechops.com to explore the fascinating world of technology and data. Get ready for more exciting content. Thank you, and happy learning!


1 thought on “Step-by-Step Guide: Using HashiCorp Vault to Secure AWS Credentials in Jenkins CI/CD Pipelines with Terraform”