Introduction
In the world of Kubernetes, few issues are as frustrating and potentially disruptive as OOMKills. You’ve built your containerized application, deployed it to your Kubernetes cluster, and everything seems to be running smoothly until, suddenly, your pods start crashing with the dreaded “OOMKilled” status. What happened? Why did Kubernetes terminate your workload? And most importantly, how can you prevent this from happening again?
This comprehensive guide will delve into the mechanics of OOMKills in Kubernetes, explore their root causes, and provide practical strategies to prevent them from affecting your applications.
What Is an OOMKill in Kubernetes?
OOMKill stands for “Out of Memory Kill.” It occurs when the Linux kernel’s OOM Killer mechanism terminates (kills) a process due to the system running out of memory. In a Kubernetes context, this happens when a container within a pod attempts to use more memory than it’s allowed, triggering the OOM Killer to terminate the container to protect system stability.
When this happens, Kubernetes marks the pod with an OOMKilled status, indicating that it was terminated due to an out-of-memory (OOM) condition. You’ll typically see the following indicators:
- The pod status showing OOMKilled
- An exit code of 137 (128 + SIGKILL(9)) in container logs
- Events showing memory exceeded limits
Why OOMKills Happen in Kubernetes
Understanding why OOMKills occur requires knowledge of how Kubernetes manages memory resources and how the Linux kernel handles memory pressure. Let’s break down the primary causes:
1. Memory Limits Are Too Low
You might set memory limits without knowing how much your app actually needs. If it goes over that limit, the pod is killed.
Example: A fintech startup had frequent OOMKills in their fraud detection pods because their memory limit (2Gi) was too low. The app needed 3.5Gi at peak.
2. Sudden Traffic Spikes
Sometimes the app works fine — until it doesn’t. A sudden spike in traffic can push memory usage way up.
Example: An online store’s checkout service crashed during a flash sale. The spike in users caused memory usage to jump, and the pod was killed.
3. Other Pods Are Using Too Much Memory
Even if your pod behaves, a neighbor on the same node might hog memory and cause system-wide pressure. The kernel starts killing processes — starting with the least important.
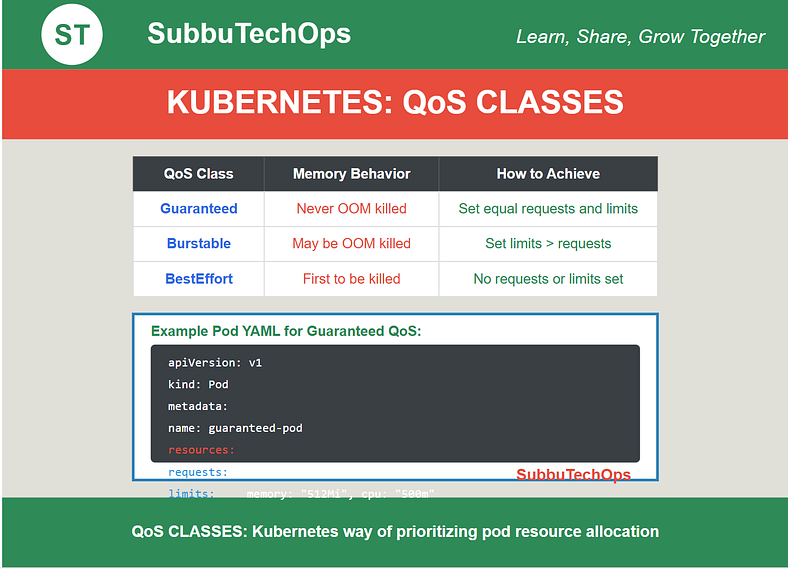
Kubernetes ranks pods based on importance using something called QoS (Quality of Service) and an internal score (oom_score_adj). BestEffort pods are killed first. Guaranteed ones are last in line.
4. Node-Level Memory Exhaustion
Even with properly configured container limits, OOMKills can still occur if the entire node runs out of memory. This happens when:
- The sum of all containers’ memory usage approaches the node’s capacity
- System processes require memory
- Memory fragmentation reduces available memory
- Memory leaks accumulate over time
The OOM Killer’s Decision-Making Process
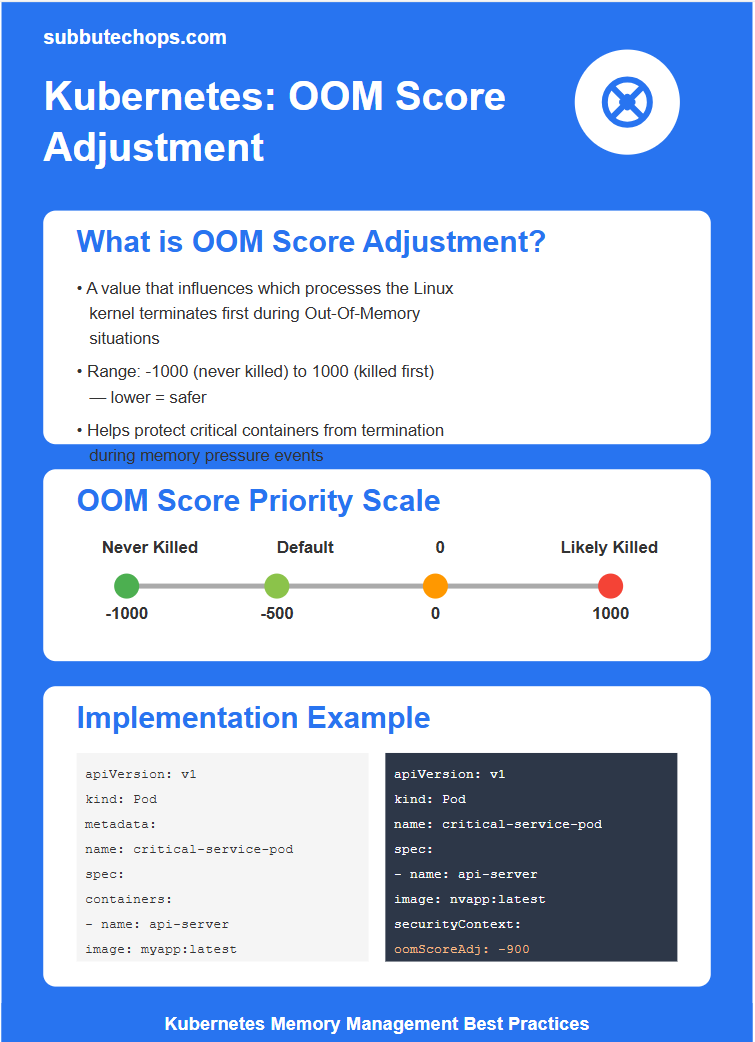
To understand OOMKills better, it’s essential to understand how the Linux OOM Killer decides which process to terminate when memory is scarce. The OOM Killer assigns each process an “OOM score” based on:
- The amount of memory the process is using
- The process’s runtime
- The process’s OOM score adjustment value (oom_score_adj)
Kubernetes leverages this mechanism by setting the oom_score_adj values for different containers based on their importance and QoS class:
- Guaranteed QoS pods (equal resource requests and limits): Lower OOM score, less likely to be killed
- Burstable QoS pods (resource requests < limits): Medium OOM score
- BestEffort QoS pods (no resource requests or limits): Highest OOM score, most likely to be killed
This QoS-based prioritization helps Kubernetes maintain system stability by terminating less critical pods first.
How to Detect OOMKills in Your Cluster
Before you can fix OOMKill issues, you need to be able to detect them. Here are several methods to identify OOMKills in your Kubernetes environment:
Method 1: Kubernetes CLI Commands
Use the kubectl command to check pod status and events:
# Get pod status
kubectl get pods

# Check pod details
kubectl describe pod

# Look for OOMKilled in terminated reasons
kubectl get pod  -o jsonpath="{.status.containerStatuses[*].state.terminated.reason}"
Method 2: Kubernetes Events
Kubernetes generates events when pods are OOMKilled:
kubectl get events --field-selector involvedObject.name=
Method 3: Node and Container Logs
Check node logs for OOM killer messages:
# For systemd-based systems
journalctl -k | grep -i "Out of memory"

# For container logs
kubectl logs   --previous
Method 4: Monitoring Tools
Use monitoring tools like Prometheus and Grafana to track memory usage trends and set up alerts for conditions that might lead to OOMKills, such as:
- High memory utilization across nodes
- Pods approaching their memory limits
- Repeated container restarts
🛠️ How to Prevent OOMKills in Kubernetes
Now that we understand what OOMKills are and how to detect them, let’s explore strategies to prevent them from affecting your applications:
Strategy 1: Set Appropriate Memory Limits
One of the most effective ways to prevent OOMKills is to set appropriate memory limits for your containers based on actual usage patterns:
apiVersion: v1
kind: Pod
metadata:
  name: memory-optimized-pod
spec:
  containers:
  - name: app
    image: your-app-image
    resources:
      requests:
        memory: "128Mi"
      limits:
        memory: "256Mi"
Follow these best practices:
- Use application profiling to determine realistic memory needs
- Set requests close to average usage and limits for peak usage
- Add a buffer (typically 20–30%) to account for variability
- Regularly review and adjust limits based on actual usage
Note:
Application Profiling for Memory Management:
Application profiling involves analyzing your application’s memory usage under various conditions to determine its actual memory requirements. This data-driven approach helps you set appropriate memory limits in Kubernetes, reducing both OOMKills and resource waste.
Strategy 2: Implement Guaranteed QoS
To make specific pods less susceptible to OOMKills, give them Guaranteed QoS by setting identical requests and limits:
Why it works: Kubernetes reserves memory just for that pod.

This makes the pod less likely to be killed during memory pressure, as Kubernetes considers it a higher priority workload.
Strategy 3: Modify OOM Score Adjustment
For critical system components, you can directly modify the OOM score adjustment to make them less likely to be killed:
The oomScoreAdj value ranges from -1000 (least likely to be killed) to 1000 (most likely to be killed).
This tells Kubernetes: “Only kill this if there’s no other option.”
Example: A hospital used this for their alert system. Even during memory spikes, alerts kept flowing.
Strategy 4: Leverage Horizontal Pod Autoscaling
Instead of allocating large amounts of memory to a single pod, use Horizontal Pod Autoscaler (HPA) to distribute the workload:
Example: A video platform scaled their transcoding pods based on memory spikes during uploads. No more OOMKills.
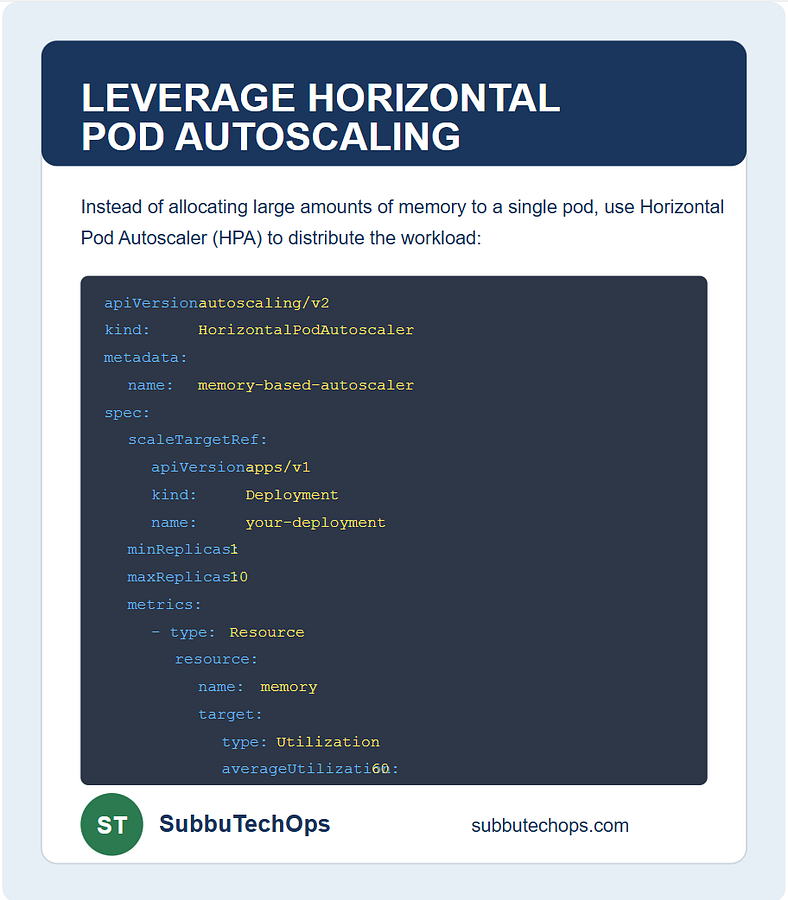
This scales your application based on memory usage, preventing individual pods from reaching their limits.
Strategy 5: Node-Level Resource Management
Improve node-level resource management to prevent system-wide memory pressure:
- Implement node anti-affinity to distribute memory-intensive workloads
- Use node taints and tolerations to direct memory-intensive workloads to appropriate nodes
- Configure kubelet reserves to protect system resources
- Consider using node autoscaling to add capacity when needed
Example: A gaming company separated their training jobs from game servers. This stopped training crashes from taking out player sessions.
Strategy 6: Monitor and Proactively Address Memory Issues
Implement comprehensive monitoring to detect and address memory issues before they trigger OOMKills:
- Set up memory utilization alerts at various thresholds (e.g., 70%, 85%, 95%)
- Monitor memory trends over time to identify gradual increases
- Set up alerts for container restarts that might indicate OOMKills
- Use container runtime metrics to get detailed memory usage information
Why it helps: You get time to fix things before Kubernetes steps in and kills something important.
Real-World Examples and Solutions
Let’s look at some common scenarios that lead to OOMKills and their solutions:
Example 1: Java Applications with Unpredictable Memory Usage
Problem: A Java-based microservice occasionally experiences OOMKills due to garbage collection inefficiencies and heap memory growth.
Solution:
- Set appropriate JVM heap limits using -Xmx flags
- Enable container-awareness in Java 11+ with -XX:+UseContainerSupport
- Configure garbage collection for container environments
- Set Kubernetes memory limits slightly higher than JVM heap maximum
Example 2: Flash Sale Meltdown — E-Commerce
Problem:
During a Black Friday flash sale, a major e-commerce platform’s backend order service started getting OOMKilled. Memory usage spiked due to bursty traffic and larger-than-normal shopping carts. The result? Thousands of failed checkouts within minutes.
Solution:
- Implemented Horizontal Pod Autoscaler based on memory metrics
- Moved critical services (like checkout and payments) to Guaranteed QoS
- Rewrote part of the order service to stream cart data instead of loading it all into memory
Outcome:
On the next sale event, zero OOM kills and a 40% increase in successful orders per second.
Example 3: Telecom Signaling Stability
Problem:
A telecom provider running a Kubernetes-based VoIP signaling stack saw random pod restarts during high-volume call spikes, especially during live televised events.
Solution:
- Assigned oomScoreAdj: -1000 to the SIP signaling pod
- Gave it Dedicated NodePool with high-memory nodes
- Ensured it ran under Guaranteed QoS
- Added node-level memory alerts with Prometheus
Outcome:
SIP pods stayed up through record call volumes. The only pods killed under pressure were metrics collectors and non-critical background services.
Example 4: Data Processing Application with Memory Spikes
Problem: A data processing application experiences memory spikes when processing large files, leading to OOMKills.
Solution:
- Implement chunking to process data in smaller batches
- Use streaming processing where possible
- Scale horizontally during high-load periods
- Implement backpressure mechanisms to control inflow
Best Practices Summary
To effectively manage and prevent OOMKills in Kubernetes:
- Understand your application’s memory usage patterns through profiling and monitoring
- Set appropriate resource requests and limits based on actual usage
- Use the right QoS class for your workloads based on their criticality
- Implement memory-efficient application design patterns
- Scale horizontally rather than vertically when possible
- Monitor memory usage proactively at both the container and node level
- Regularly review and adjust your memory management strategies
Conclusion
OOMKills in Kubernetes can be disruptive, but they’re also manageable with the right approach. By understanding why they occur, detecting them early, and implementing preventive strategies, you can maintain stable, reliable applications even under memory pressure.
Remember that effective memory management is a continuous process that requires ongoing attention and adjustment as your applications evolve and your workloads change. The strategies outlined in this guide provide a comprehensive framework for addressing OOMKills in your Kubernetes environment, helping you build more resilient, reliable applications.
By taking a proactive approach to memory management, you can minimize disruptions, improve application reliability, and ensure a better experience for your users.
For more insights into the world of technology and data, visit subbutechops.com. There’s plenty of exciting content waiting for you to explore!
Thank you for reading, and happy learning! 🚀